Charlene
We are thinking about either putting it on the computer cart or the wall. It is a little unnerving to mount this very important piece of electronics on the table where water can get on it... Nothing definitive yet.
wickedinhere
I bolted mine to the table and built a splash guard so water wont get on it.
jeepsr4ever
We mount control boxes under the table by bolting some angle aluminum to the bottom of the frame. I will put up some pictures with the next update.
tlspeed1
Charlene;131781 wroteWe are thinking about either putting it on the computer cart or the wall. It is a little unnerving to mount this very important piece of electronics on the table where water can get on it... Nothing definitive yet.
That was my concern too!
i think it would be cleaner for wiring being under the table, but dont want it to get wet.
Charlene
jeepsr4ever;131784 wroteWe mount control boxes under the table by bolting some angle aluminum to the bottom of the frame. I will put up some pictures with the next update.
Thanks Matt. I am looking forward to the next update. Also, do you have some input on my question about the cable carriers? (I sent you a PM or maybe it was an email.)
jeepsr4ever
Charlene
Thanks for pics Matt. They are very helpful. We are assuming that we need to attach another piece of aluminum off the y axis plate to attach that end of the carrier. Is this correct?
Please stay out of the plasma instructional
jeepsr4ever;131784 wroteWe mount control boxes under the table by bolting some angle aluminum to the bottom of the frame. I will put up some pictures with the next update.
Would it make sense to use a single piece of angle for the control box support and the carrier. (Using a cutout on the down leg, it would straddle the 3x3 tube. Not that you would need to, but by making two of the three cuts on the angle, the cutout could be bent for use as a mounting tab on the vertical (tube) surface.
jeepsr4ever
You can do it anyway you want these are just suggestions.
Charlene
Thanks Matt. I will have lots of update photos tomorrow! Very exciting!
Charlene
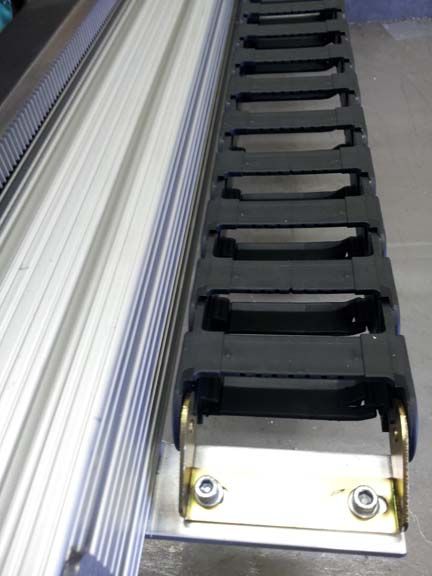
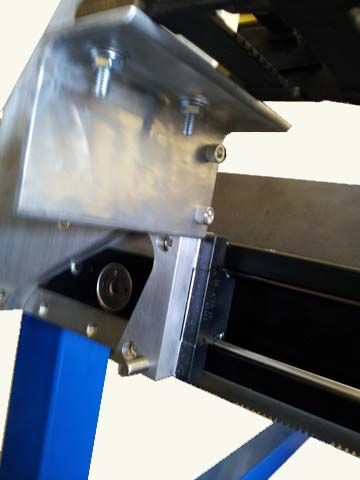
Alright, we have finished the slats, made & attached the brackets for the lower cable carrier, attached the upper carrier (will attach the upper bracket tomorrow), cut & painted the brackets to mount the plasma & electronics! Tomorrow we will be almost complete!!
[ATTACH=CONFIG]160[/ATTACH]
We used alum. bar for the brace and decided to go with angle to provide a path for the cable carrier.
[ATTACH=CONFIG]161[/ATTACH]
[ATTACH=CONFIG]162[/ATTACH]
[ATTACH=CONFIG]163[/ATTACH]
[ATTACH=CONFIG]164[/ATTACH]
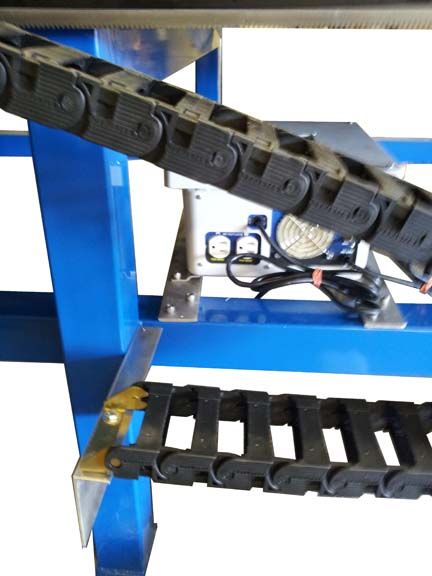
Our compressor & air dryer.
[ATTACH=CONFIG]165[/ATTACH]
[ATTACH=CONFIG]166[/ATTACH]
wickedinhere
Looking good!
Charlene
Alright, this may be a stupid question but... how do you feed the torch cable through the cable carrier? We have a Hypertherm 85. The torch doesn't fit as a whole and it really doesn't look like it should be taken apart... Help!
jeepsr4ever
There are clips on the side take a flat head screwdriver and twist in the slot..this will unclip the little clips. On the metal brackets take the plastic cable chain out from the bracket to feed the rest of your torch lead then reattech the metal bracket. On the A axis feed the motor wires through the center of the rail support. There is a large tilted 90 degree hole that is large enough for the wire with the plug.
Charlene
Perfect, thanks again! I will post a few more pics later today.
Charlene
Here are a couple more pics.
Who knew?!?! They pop open...
[ATTACH=CONFIG]167[/ATTACH]
We decided to go with a shelf under the table for the plasma and we hung the CNC. We will see how well this works.
[ATTACH=CONFIG]168[/ATTACH]
Just a general pic of the table, gantry w/ torch, cable carrier w/cable, etc.
[ATTACH=CONFIG]169[/ATTACH]
Glenn will be in training tomorrow at his real job and then doubling back to go in at midnight... Yuck!:shock: So we will work on this again on Thursday.
wickedinhere
Yall gettin it done! lol I am glad i will have your build to look at when i do mine so i dont have to scratch my head so much.
Charlene
HELP!! Getting ready to make our first cut but when I hit Reference Y, the Y axis traveled all the way to the right and off the rack and kept spinning until I pressed Stop. Then I hit Reference X and only the A stepper motor engaged... X & A are slaved... Very FRUSTRATED!!!
wickedinhere
Move it with the arrow keys on the keyboard dont hit reference. Did you slave them in the motor config in mach3?
Charlene
Yes I did. So, the reference button is only for people with limit switches on x & y? Next question: when I did just jog to the corner and zero them, the z axis shows in the positive when I move it up & away but the y axis shows negative movement when it travels away from the corner... What does this mean?