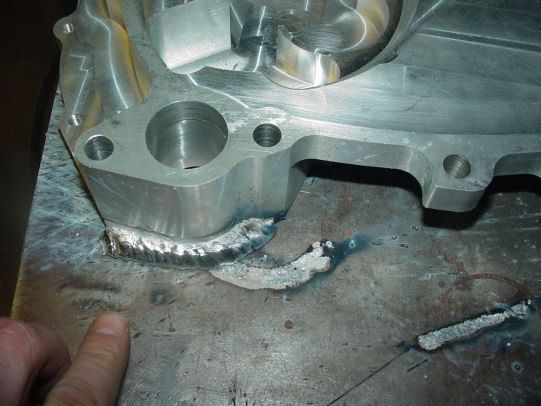
Blown7
[quote=Lifted79CJ7]Soooooo....any updates?[/quote]
Yea??????????????
X2
jeepsr4ever
Yes! I had to weld up the water pump area to allow the side of the water pump to seal. I am building a fixture as I type this to put the oil pan mounting bolt holes and oring cahnnel for the oil pan seal in. The other fixture is for the distributor hole and will be done shortly. These fixtures will be used for all our new timing covers. Their is a relief that must be milled into the back for the pump and I need to plug two holes and counterbore two. Almost ready for you Jeff. :idea:
jeepsr4ever
I will post some pics of the welding tomorrow.
Blown7
[quote=jeepsr4ever]I will post some pics of the welding tomorrow.[/quote]
Waiting............. :t:
jeepsr4ever
Right,... :sa:
Ok here is the welding to the water pump area. I used our steel welding table to allow a flat face on the water pump mounting surface so ti would be easy to blend in.
[img]http://i2.photobucket.com/albums/y29/bulltear/mjef1.jpg[/img]
jeepsr4ever
Here I am outlining the material from the weld that must be removed with a water pump gasket. Jeff these gaskets arent as accurate as I thought!! FYI Did you know AMC originally designed the water pump and timing cover to use 2 alignment pins. You can tell a very accurate gasket from a std gasket if you see two mystery holes. These holes were for the pins that were designed to aling the pump to the timing cover. The holes are located in the two triangular outcroppings. We have a AMC engineer on the site who may chime in on these. The history behind these parts is fun to learn!!
[img]http://i2.photobucket.com/albums/y29/bulltear/mjef2.jpg[/img]
jeepsr4ever
Here you can see the area that must be removed
[img]http://i2.photobucket.com/albums/y29/bulltear/mjef3.jpg[/img]
jeepsr4ever
Here is the water pump mounting surface after welding and blending. Their is a cosmetic look on the left hand side but after checking it even a paper gasket would seal.
[img]http://i2.photobucket.com/albums/y29/bulltear/mjef4.jpg[/img]
More pics very soon...well as soon as I get back from the many Christmas's I will be attending!
Blown7
Where was I when you posted those pics???
Boy I missed them until I actually went looking for this thread to ask where the pics are.
Enlighten me Oh Great One.........
Why did you have to weld the H2O pump area to begin with?
J
fifesjeep
Kinda curious also... The piece looked good before, but now, it has a couple of eye sores :idea: #-o ... I vote on a re-start cut the next piece of billet and clamp her in the mill, re-boot/pull-up that program and press start. :mrgreen: :razz:
jeepsr4ever
The water pump mounting area was just too thin.
fifesjeep
What was the wall thickness? What kind of pressure would it have seen?... Or were you more concerned about warping?
jeepsr4ever
Not the wall the area, where the gasket sits. Its didnt warrant another $300 chunk of aluminum it just needed a little more material.
Blown7
[quote=jeepsr4ever]Not the wall the area, where the gasket sits. Its didnt warrant another $300 chunk of aluminum it just needed a little more material.[/quote]
You got that right Bro, as long as the TIG works keep moving foward. :lo1l:
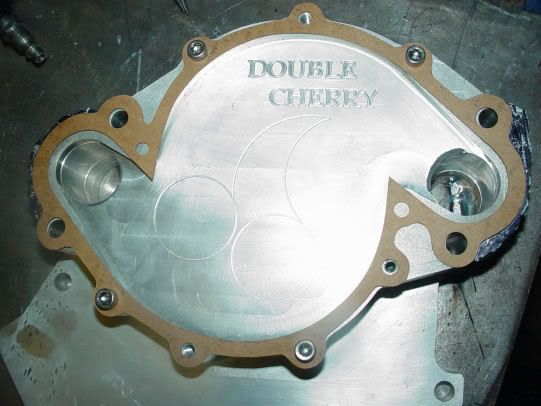
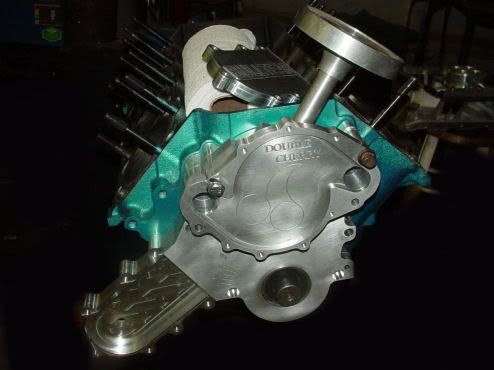
I can assure you that with all the stuff on the front of this engine no one will ever see that weld.
Jeff
fifesjeep
Did you use a Tig? or was it Mig? Looks kinda big for tig then again I didn't look at the pic too closely. I'll have to go back and look at it.
ironman_gq
you can make some pretty large welds with a TIG they may not be the prettiest when their that large but you can do it no problem. been there done that I had to build up a spacer with TIG and I made some pretty big beads
Blown7
Sooooooo we done yet Bro?? [-o<
jeepsr4ever
[img]http://i2.photobucket.com/albums/y29/bulltear/tcv1.jpg[/img]
[img]http://i2.photobucket.com/albums/y29/bulltear/tcv2.jpg[/img]
Just a few finishing touches then its onto a motor for the final adjustment. ...well hopefully no adjustment! Just because verything looks good on CAD doesnt mean it will turn out 100%. I have learned this from many years of machining.
Blown7
[quote=jeepsr4ever][img]http://i2.photobucket.com/albums/y29/bulltear/tcv1.jpg[/img]
[img]http://i2.photobucket.com/albums/y29/bulltear/tcv2.jpg[/img]
Just a few finishing touches then its onto a motor for the final adjustment. ...well hopefully no adjustment! Just because verything looks good on CAD doesnt mean it will turn out 100%. I have learned this from many years of machining.[/quote]
That is beautiful! And just think by the time it gets home it will be one year since it was designed!
J
Patf10
i like all the fancy machining and the thought put into making a custom piece. and then mocking it up on the block, and i love putting on with a rusty bolt