jeepsr4ever
[SIZE=7]USE THIS ONLY ON 2011 AND EARLIER MODELS[/SIZE]
We have had a couple of inquiries as to how fast you can go from 0-100 with the system we offer. If you ordered a gantry kit or a complete table and are setting up software please follow these instructions.
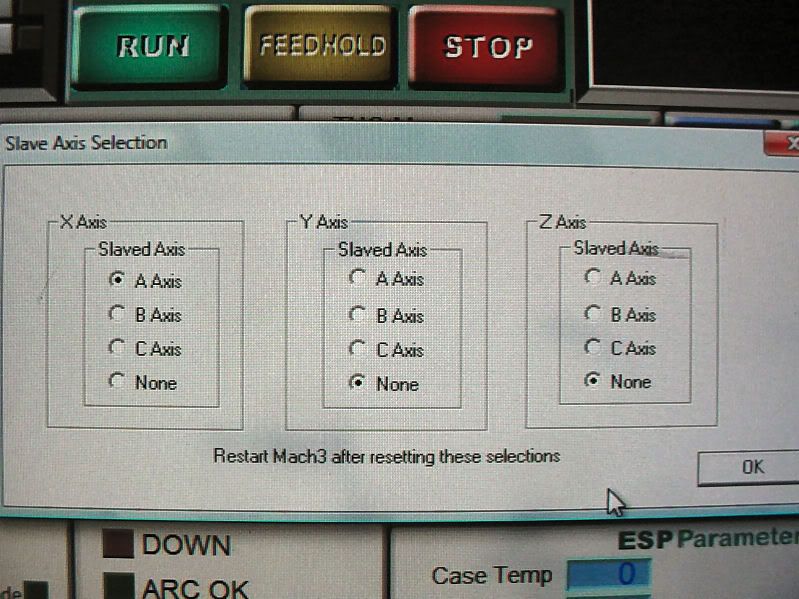
1. Setup Mach3 using the MPTHC1000 as the primary profile and not the general buttons (Mill, Plasma, Turn, EMD...ect)
2. Go into your Mach3 once you are running the DTHC1000 profile and go to your config tab. Because we use a dual drive zero backlash system you want to slave an axis. Some will slave X and A and some will slave Y and A depending on which cables are hooked up. For this example lets slave X and A. Remember to save you settings.
[IMG]http://i2.photobucket.com/albums/y29/bulltear/slaveaxis.jpg[/IMG]
3. Now lets go to config and motor tuning. Bulltear tables use a very smooth gear on all axis but not the same size gear or pitch on all axis. For X,Y,A axis the following is used.
1019.1 Steps
1000 Velocity (V can be 1-1000)
30 Accel (accel can be 1-50)
Z axis (torch up and down)
1273.9 Steps
150 Velocity
50 Accel
This gives you very accurate movements of .001" (2,754,000 points on a 4x4 table, actual travel 54x51 or 5,200,000 points on a 4x8 table, actual travel 104x50)
4. You will get a demo copy of Sheetcam you can use for many projects. To use Sheetcam you move the MPC1000-THC.post into the "post" directory in Sheetcam using your windows documents browser and click and drag or cut and paste.
5. You will need a drawing or CAD software for use with our tables. Their are hundreds to choose from and some are even free.
This completes the software and motor tuning area of your table. This will get you up and running with the software sent with the electronics provided you have some CAD software
Creepy
is the "1000" up to date?
I'm running MP3000-DTHC-UBOB profile.
saw a guy asking in another thread.
jeepsr4ever
Yes MP3000 is the up to date version all users as of 05-09 must use the MP3000
stillworkin
I changed my motor tuning to these settings in motor tuning in mach 3 and now my z doesn't rapid above the material. I have an older table with the v-rails so i thought these settings applied to me. i wrote down the previous settings i had for the XYA but forgot to write down the settings for z. the reason i thought i needed to change these setting is becaus my circles are not coming out as circles, as i watch the machine i don't see any noticeable excess movement in any of the gantrys so i assumed it was a software problem. PLease help!
Thanks,
Martin Fountain
jeepsr4ever
Do you have the steel or aluminum Z axis?
jeepsr4ever
24000 steps per is the alternative for the older z axis
stillworkin
mine is alum. I will try 24000 steps tomorrow. Thanks!
Martin Fountain
stillworkin
I set my z axis to 24000 and when i refrence Z in mach3 and i jog the z-axis up until the torch is physically .06" above the metal (measuring with a feeler gage) the DRO reads .1621, i subtracted my .06 from .1621 and came up with .1021 which i assumed would be my "switch offset". In sheetcam i did the edit post process mp1000-thc switch offset = .1021. I ran my post processor in sheetcam and loaded my part, i zero'd my x and y and then referenced my z and the DRO in the z read -.1021. I watched the DRO as the part cut and for the first pierce it pierced @ .18 like it is supposed to and then it came down to .06" cut height which is what i hoped for, well when it went to the next pierce point and the z axis came down to zero it touched off @ the plate and the DRO read +.1021 and then from there on out it added that amount to every pierce.
Please help! Before i had my z set to 12739 steps per and just let my THC control the cut height with the voltage and for the most part things went well minus a small bit of Kerf. I would like to have it set up correctly.
Thanks,
Martin Fountain
also if you can email @ [email]martin_fountain@yahoo.com[/email]
jeepsr4ever
You never have to REF your Z axis from the initial setup. Accumulating Z axis..hmmm. Not sure if you ened to reload Mach 3 or not.
stillworkin
On a typical part i will jog the machine to a place on my table where i have enough metal to cut my part, i then "zero x" and "zero y" then " ref z" and my z would come down to the plate and then trip the switch and reset my DRO for Z 0.0000. If i jog my z upwards so that the DRO reads 0.0600 the torch will still be touching the plate. That is why i jogged the z axis up until a feeler gage of .06 would just fit between the torch and plate and my DRO would read 0.1621.
So i took 0.1621 and subtracted .06 and got .1021 which i set as my switch offset in sheetcam. make note after i made the change and reloaded my part into mach3 and "ref z" it would show -.1021 in the DRO and if i jogged my z-axis up until the DRO read 0.0600 and measured with the feeler gage it would be correct. For further testing i jogged the z-axis up until it read 0.500 and meausred the gap it was correct. So i tested again and jogged the z-axis up to 1.0000 and measured the gap and once again successful 1.0 was measured.
Its only when i hit "RUN" and the part runs and which every pierce the z will come down and refernce that it starts accumulating the .1021.
My Z axis consists of a 3/8"-12 acme thread rod, a Stepper motor with 200 steps per revolution and the Gecko Drive with 10 micro steps. I believe this is where the 24000 steps per came into account. 200 steps per rev * 10 micro steps = 2000 steps * 12 tpi = 24000 steps per.
When my part is running mach touches down to zero the z-axis with every pierce.
Thanks,
Martin Fountain
jeepsr4ever
If you keep ref'ing z axis you may keep getting this issue. Stop ref'n your z axis mach will do that for you when you hit run